
How to install a GPS tracking device? Well, Installing a GPS tracker isn't rocket science, but there's definitely a right way and wrong way to do it.
It doesn't matter if you're trying to keep tabs on your fleet or just want some peace of mind about where your car is, getting the installation right makes all the difference.
This easy installation guide covers everything from portable GPS devices to hardwired GPS trackers for complete vehicle tracking.
What Tools Do You Need for GPS Tracker Installation?
The tools you need really depend on which type of tracker you're installing. Here's what you'll need for each type:
For Hardwired GPS Trackers:
-
Wire strippers
-
Crimpers
-
Multimeter
-
Soldering iron (recommended)
-
Heat shrink tubing
-
Electrical tape
-
Zip ties
-
Posi-taps (if not soldering)
-
3-5 amp fuses
For Magnetic GPS Trackers:
-
The tracker itself (like the GL300MA with magnetic case)
-
Cleaning supplies (to wipe mounting surface)
-
Weatherproof case (if mounting externally)
For OBD-II GPS Trackers:
-
No tools required (plug-and-play)
-
Optional: Y-cable for extension
-
Optional: zip ties for securing
Note: Most people can handle the simpler installations themselves. The OBD-II trackers are plug-and-play basically - no tools required. These wireless solutions are perfect for fleet tracking and car tracking applications.
How to Choose the Right Installation Location in Your Vehicle?
Location is everything when it comes to GPS trackers. You want good GPS signal reception but also want to keep things discreet. Modern GPS systems and navigation systems rely on clear satellite communication to monitor your vehicle effectively.

Strategic Placement Locations for Maximum Signal Strength
The key thing to remember is that GPS signal can penetrate glass, plastic, and wood, but not metal.
Ideally, the GPS tracker should be be mounted high underneath the plastic dashboard of the vehicle so the antenna side of the device has a good view of the sky through the front windshield.
This ensures optimal satellite receiver performance.
Here are the best spots:
-
Under the dashboard near the windshield
-
Inside plastic bumpers
-
Under seats (test GPS signal strength first)
-
In the trunk area, but away from spare tire wells
-
Behind interior panels
Signal Interference Zones to Avoid
Some areas just kill GPS signals. Generally, GPS signals travel unobstructed through glass, rubber, fiberglass, cardboard, carpets, plastic, and other materials.
However, trackers sometimes struggle to receive signals when placed next to metal or concrete.
Stay away from:
-
Under the hood (too much metal)
-
Near the engine block
-
Inside metal toolboxes
-
Too close to other electronics that might cause interference
Weatherproof vs. Interior Installation Considerations
|
Location Type |
Pros |
Cons |
Best For |
|
Interior |
Protected from elements, easier access |
May have weaker signal in some spots |
Most passenger vehicles |
|
Exterior |
Better signal reception, harder to find |
Needs weatherproof housing |
Commercial vehicles, covert tracking |
|
Under hood |
Hidden from passengers |
High heat, signal blocked by metal |
Not recommended |
How to Install a Hardwired GPS Tracker in Your Car?
Hardwired installation gives you the most reliable power and is hardest to remove, but it takes more work. Some advanced hardwired systems even include features like remote starter disable for enhanced security.
Step 1: Vehicle Preparation and Battery Disconnection
Safety first - always disconnect your battery before starting. Turn off your car or truck's ignition.
You want to ensure that there isn't any power flowing through your car – otherwise, the process can become dangerous.
Remove the negative terminal and set it aside where it won't accidentally touch anything.
Step 2: Dashboard Removal and Access Methods
Remove the panels and covers of your car's dashboard. This way, you can access where you will be installing the device.
Different cars have different ways to access the wiring, but most involve removing some trim pieces under the steering column.
Take your time and don't force anything - plastic breaks easily.
Step 3: Identifying Power Wires and Ground Connections
This is where that multimeter comes in handy. RED goes to a constant power source connection with a voltage between +12V and +24V.
BLACK goes to the vehicle chassis or is tapped into an existing ground wire. WHITE is for vehicle ignition detection.
Connect it to a circuit that is active only when the key is in the RUN position.
Always consult the instruction booklet and wiring diagram for your specific GPS device.
|
Wire Color |
Connection Point |
Voltage Requirements |
|
Red |
Constant 12V+ power |
12-24V continuous |
|
Black |
Ground/chassis |
0V reference |
|
White |
Ignition switched |
12V when ignition on |
Step 4: Proper Wire Splicing and Connection Techniques
Use the "poke and wrap" technique to connect the constant 12 VDC power source to the red wire on the tracking device.
Though honestly, soldering is better if you know how. If you're using tap connectors, make sure they're the right size for your wires.
Step 5: Securing Wires and Preventing Wire Chafing
Route everything neatly so wires won't rub against sharp edges. Use zip ties or velcro tapes to firmly secure the device and keep it away from metal or heat-producing surfaces.
Nothing worse than having a wire wear through and short out months later. A proper wiring harness helps organize connections and prevents damage.
Step 6: Reconnecting Battery and System Testing
Once everything's connected, reconnect your battery and test. Once the GPS tracker has been connected to power, the LED lights will begin to turn on. Wait for both GPS and cellular signals to lock before you button everything back up.
How to install Mounted GPS Tracker (GB130)
Installation: This tracker uses a simple two-wire setup, connecting directly to the car's battery. You'll need to connect the 12/24V wire and the ground wire to the battery. It's easy to install under the hood, providing a discreet option if the hood isn't opened often.
Features: This device not only tracks your vehicle but also monitors your car's battery level to prevent you from being stranded.
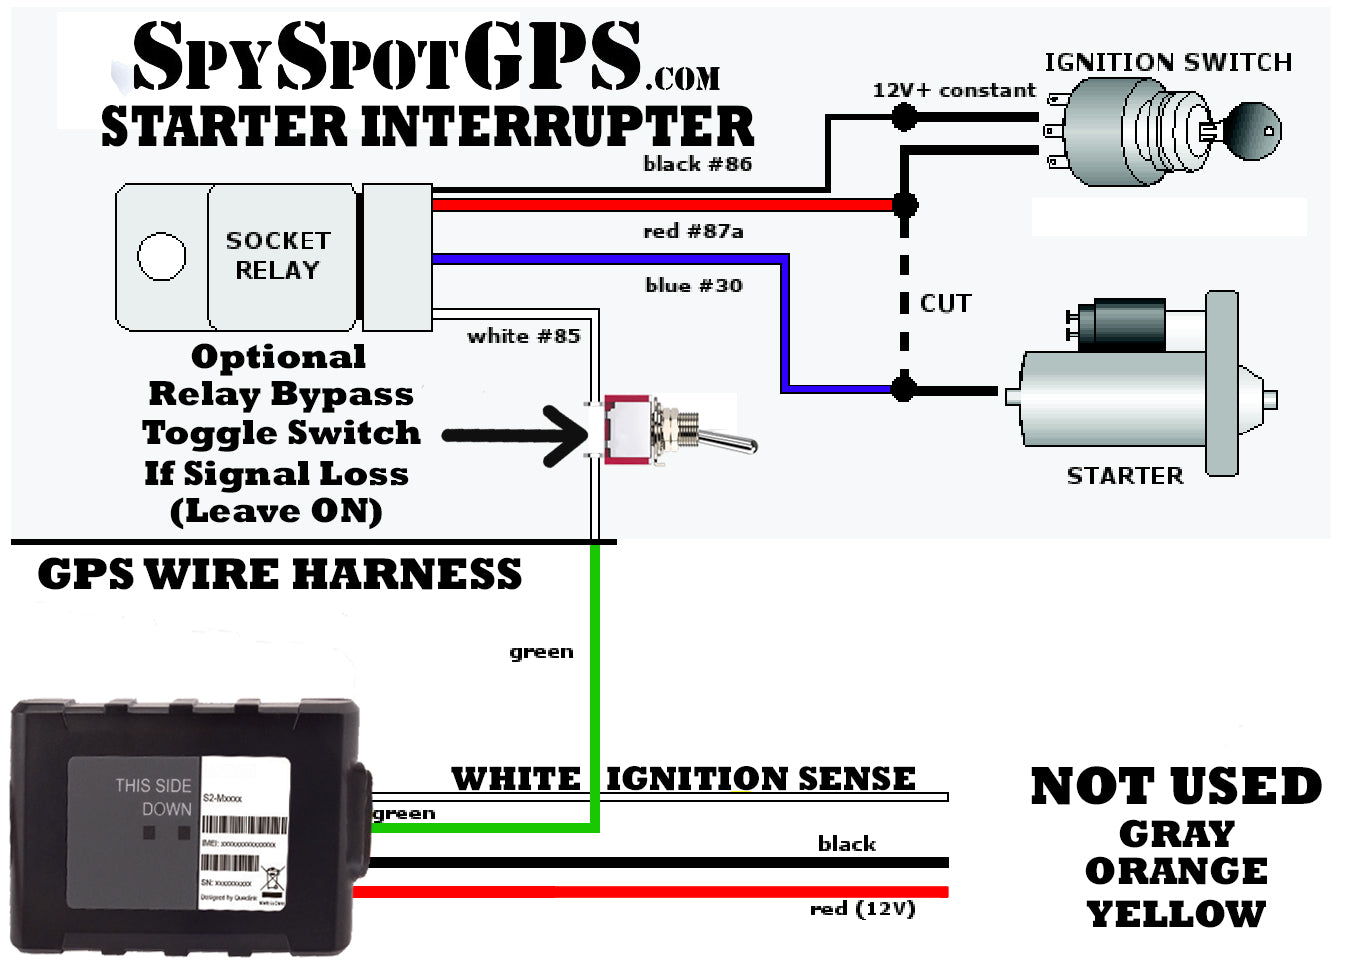
How to install the Spy Spot Hardwire GPS Tracker
Installation: The hardwired GPS tracker is a more complex option that connects to the vehicle's battery and is hidden under the hood. Professional installation is recommended for this model to ensure it's installed correctly.
Features: In addition to tracking, it offers security features like the ability to remotely control the car's ignition through an app or website.
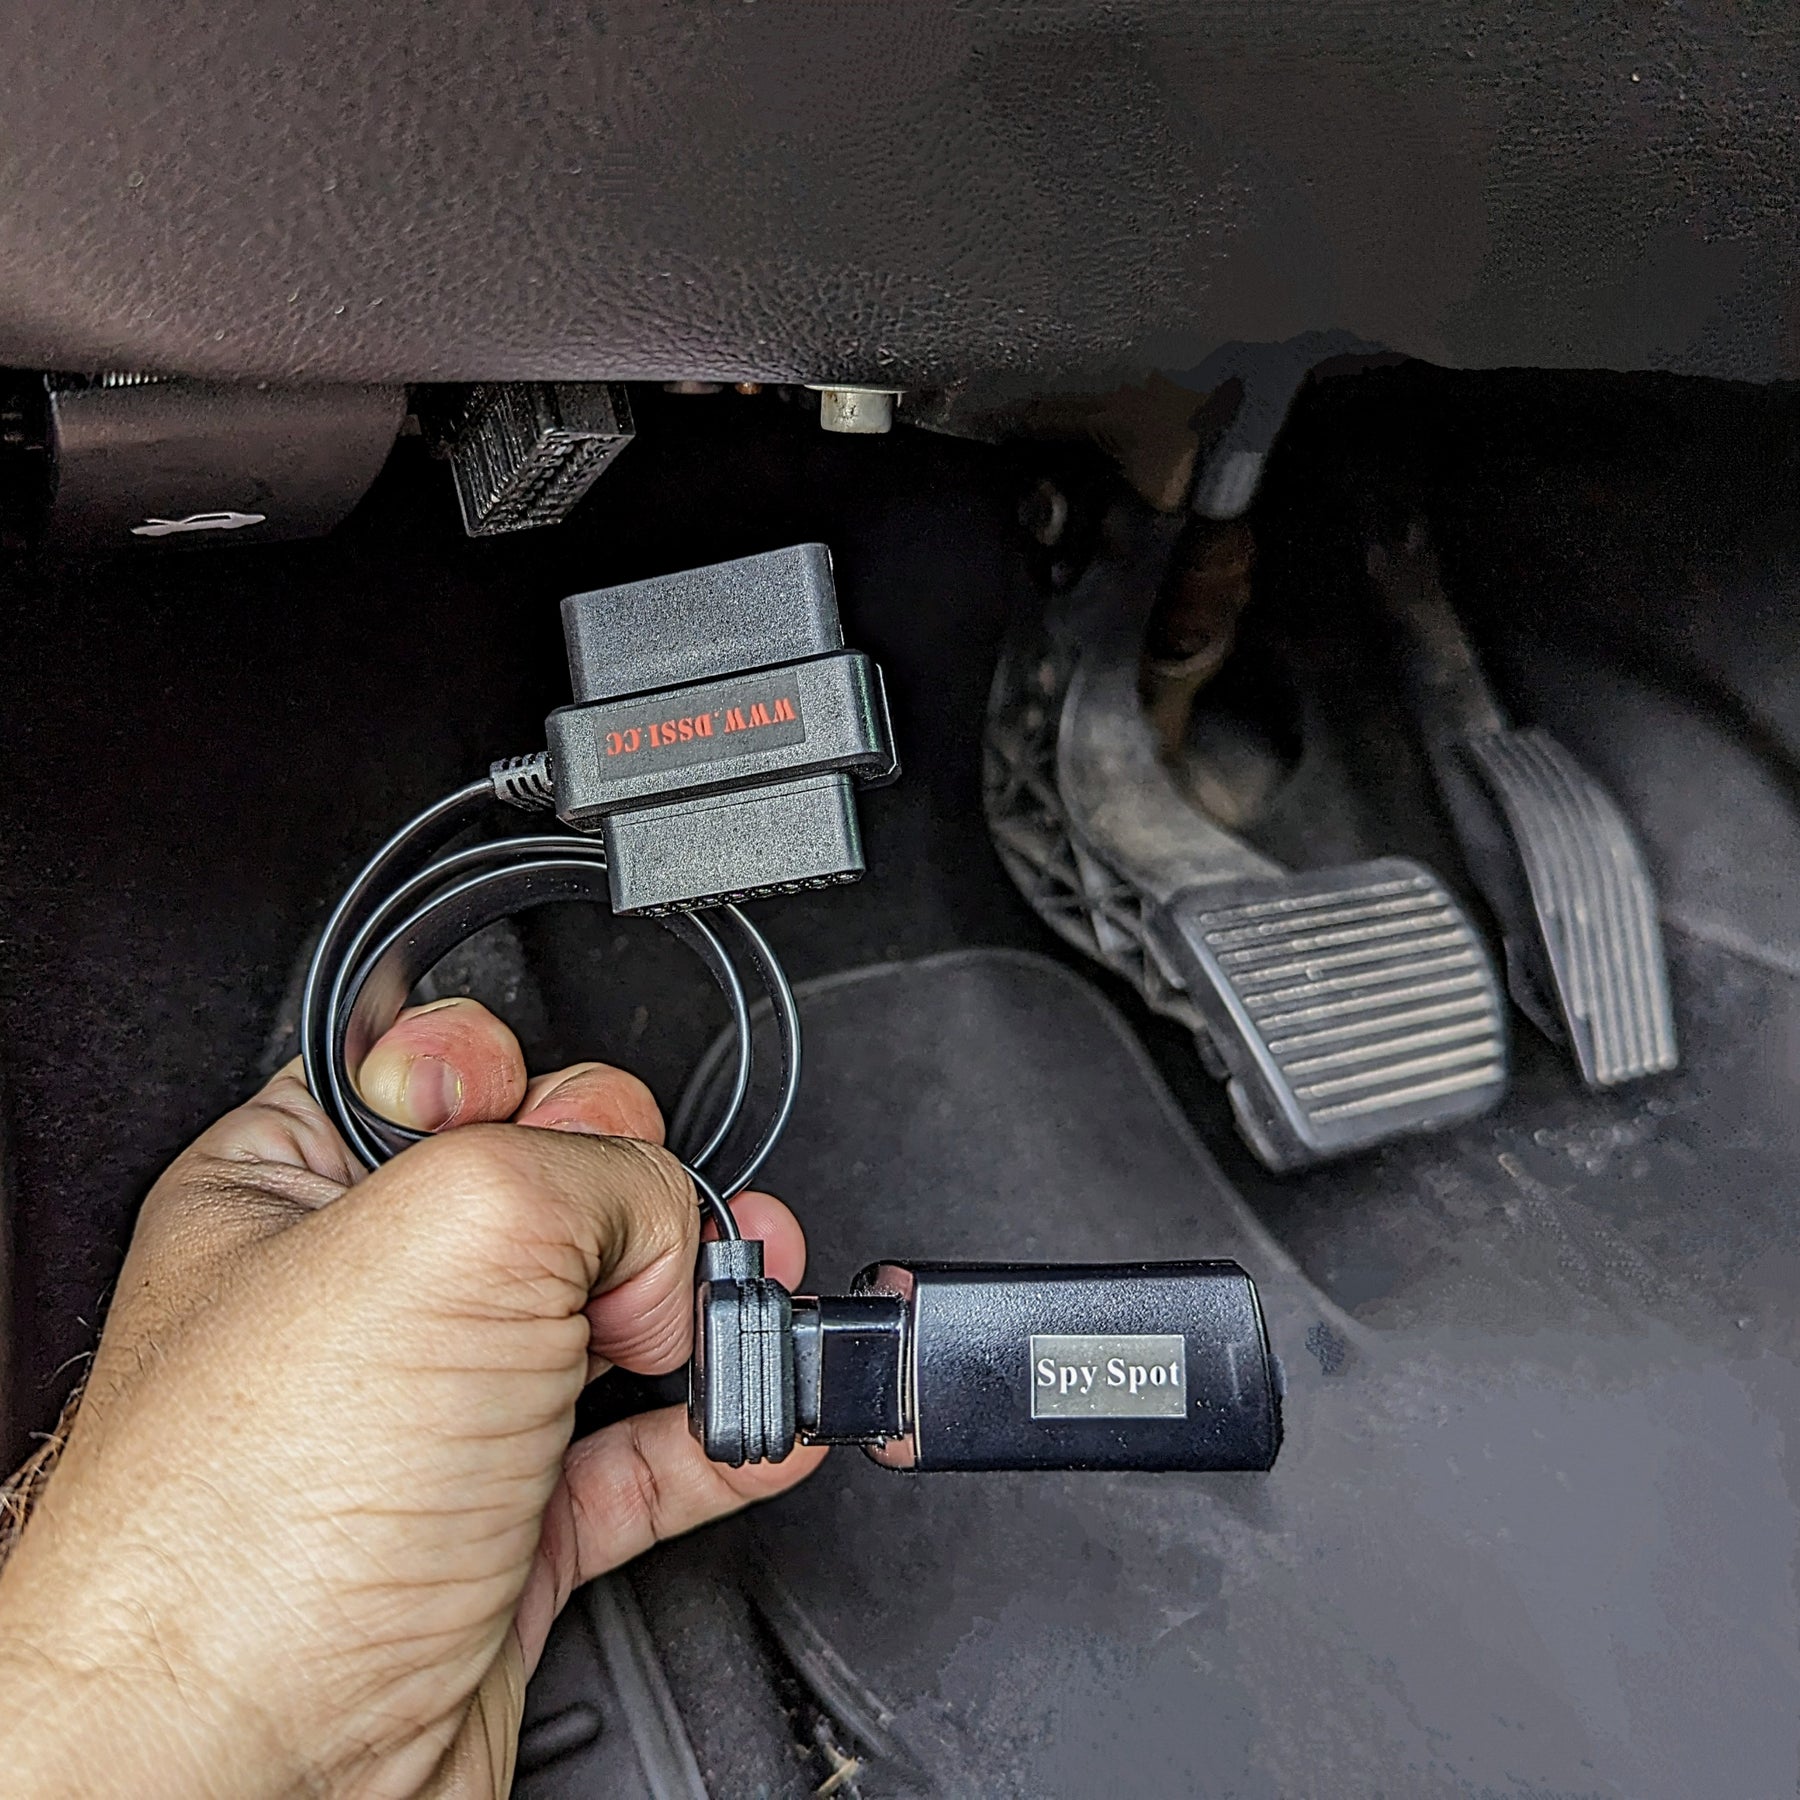
What is the Easiest Way to Install an OBD-II GPS Tracker?
OBD-II trackers are definitely the easiest way to install a GPS tracker.
Prior to installing the device, make sure the vehicle is parked on level ground with the ignition off. If the device has and on/off switch, make sure it is in the on position.
Insert the device into the OBD-II socket in the vehicle. Modern 4G OBD trackers can provide real-time updates and vehicle diagnostics right from your phone.
Step 1: OBD-II Port Location Guide by Vehicle Make
The port is usually under the dashboard on the driver's side. The OBD-II diagnostic port, also known as a Data Link Connector (DLC), is generally located on the driver's side of the car or truck under the dash.
The location will vary between different manufacturers, models, and production years of a car or truck model.
Common locations:
-
Left of the steering column
-
Under the dashboard center
-
Sometimes in the center console area
-
Check your owner's manual if you can't find it
Step 2: Port Accessibility Solutions for Difficult Locations
Some ports are in really awkward spots. Using your screwdriver, depress the tabs securing the vehicle's OBD-II port. Plug the Y Cable into the vehicle's OBD-II port.
Plug the GPS unit to the short side of the Y Cable. Y-cables let you extend the port to a more convenient location. Some adapters also include USB connections for additional functionality.
Step 3: Secure Installation to Prevent Accidental Disconnection
You will know as soon as someone removes the device. We offer many different ways to send alerts: email, text messages, app notifications and reports.
Most good trackers will alert you if they get unplugged, but securing them physically helps too.
Step 4: Concealment Techniques for OBD Trackers
The OBD port is pretty obvious if someone knows to look for it. Using extension cables and hiding the actual tracker deeper in the dash helps. Some people use zip ties or tamper-evident seals to make removal more obvious.

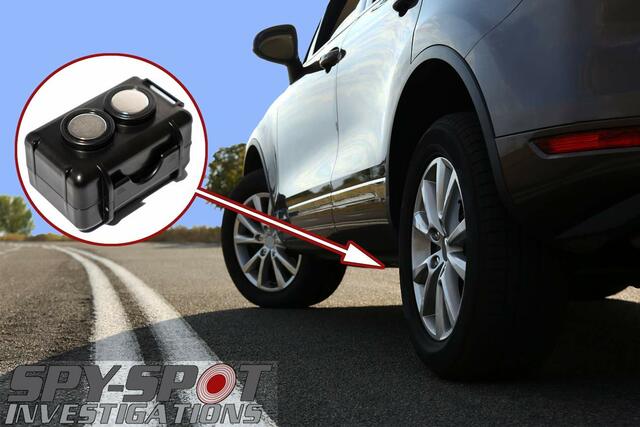
How to Install a Magnetic GPS Tracker on Your Vehicle?
Magnetic trackers are super easy to install - probably the fastest installation you can do. Devices like the GL300MA come with strong magnetic cases that attach securely to any metal surface.
These portable GPS devices offer wireless operation with built-in batteries for extended monitoring.
Step 1: Surface Preparation and Cleaning
Clean the Surface: Ensure the metal surface is clean and free of dirt, oil, or debris for a strong magnetic connection. A clean surface makes a huge difference in how well the magnet sticks.
Step 2: Identifying Metal Surfaces with Strongest Magnetic Attachment
Look for flat metal areas on the vehicle frame:
-
Behind rear bumpers
-
On the vehicle chassis
-
Inside wheel wells
-
Under the vehicle on flat frame sections
You are looking for a flat metal area, with non-moving parts. Avoid anywhere near exhaust pipes or moving suspension components.
Step 3: Weatherproofing Considerations for External Mounting
For this placement, use a weatherproof magnetic case like the Spy Spot Weatherproof Strong Stash Magnetic Case to ensure the tracker stays dry and secure. Most decent magnetic trackers come with weatherproof cases, but double-check the IP rating.
Step 4: Anti-Detection Placement Strategies
One of the best places to locate a covert GPS tracker is on the vertical edge of the frame about mid vehicle.
There are not any parts in this area that would prompt the driver to look in this area or go to this area for a maintenance issue.
Think like someone doing a casual inspection - they're not going to crawl under the car and look at every surface.
How to Install a Covert GPS Tracker for Maximum Concealment?
If you need to keep things really hidden, you've got more options but also more work.
Step 1: Identifying Non-Traditional Installation Locations
Get creative but stay practical:
-
Inside door panels
-
Under carpeting
-
Behind dashboard vents
-
In unused spaces behind panels
-
Inside plastic trim pieces
Step 2: Disassembly Techniques for Interior Concealment
Take your time removing interior pieces. Most trim clips only go back together properly if you don't break them.
If you have more time to install a tracker for vehicle theft recovery you have a few more options but challenges still persist.
The good part is you can test the tracking performance before the equipment or asset leaves the shop.
Step 3: Wire Routing Through Factory Channels
Use the same routes the factory used for other wiring. This keeps everything looking stock and prevents wires from getting pinched or damaged.
Step 4: Testing Signal Strength in Concealed Locations
If you have time, place your GPS tracker in several locations inside a vehicle to determine the best location.
You might find that some areas of the car receive stronger GPS signals than others. Don't assume a location will work - test it first.
How to Properly Connect GPS Tracker to Vehicle Electrical System?
Direct Battery Connection Method
Next, you'll need to connect the GPS tracker's power wire directly to the car's battery for constant power, with the red wire attaching to the positive terminal and the black wire to the ground. It's also wise to connect it through a fuse to protect the circuit.
Always use a fuse - usually 3-5 amps is plenty. Battery-mounted trackers like the GB130MG make this process straightforward with their simple two-wire design.
Ignition-Switched Power Connection
The white wire must be attached to an ignition/accessory wire. This lets the tracker know when the vehicle is running, which affects how often it reports location.
Fuse Tap Installation Technique
Fuse taps are cleaner than cutting into wires:
-
Find an appropriate fuse in the fuse box
-
Remove the original fuse
-
Insert the fuse tap with original fuse
-
Connect your power wire to the tap
Constant vs. Switched Power: Which to Choose?
|
Power Type |
When Active |
Best For |
Considerations |
|
Constant |
Always |
24/7 tracking |
Higher power draw |
|
Switched |
Ignition on only |
Basic monitoring |
May miss theft attempts |
|
Both |
Configurable |
Full-featured systems |
More complex wiring |
How to Install GPS Tracker Without Professional Help?
Most people can handle basic installations themselves. An OBD device can be installed in 20 minutes in most vehicles once a few have been completed.
If in doubt, contact a professional installation company. Start with easier options like OBD-II or magnetic trackers before attempting hardwired installations.
The key is being honest about your skill level. If you're not comfortable working with car wiring, there's no shame in paying for professional installation.
How to Install Multiple GPS Trackers for Redundant Coverage?
Primary and Backup Tracker Installation Strategy
Place one obvious tracker and one hidden one. If someone finds and removes the obvious one, you still have the backup working. Primary and Backup Tracker Installation Strategy (Explain complementary placement for maximum coverage)
Power Source Isolation for Independent Operation
Power each tracker from different circuits so if one gets disconnected, the other keeps working. Don't put both on the same fuse or power source.
Synchronized vs. Independent Tracking Configuration
|
Configuration |
Pros |
Cons |
Best For |
|
Synchronized |
Coordinated reporting |
Single point of failure |
Fleet management |
|
Independent |
Redundant operation |
May conflict with each other |
High-security applications |
Signal Separation Methods to Prevent Interference
Keep trackers at least a few feet apart to prevent them from interfering with each other's cellular or GPS signals.
How to Test Your GPS Tracker Installation?
Testing is crucial - don't skip this step.
-
Initial Power Test: WAIT UNTIL BOTH LIGHTS GO SOLID. THIS INDICATES A SOLID LOCK ON GPS AND CELL SIGNALS.
-
Signal Verification: Check that both GPS (usually blue/green LED) and cellular (usually red/orange LED) are working.
-
Movement Test: Track Movement: Move to a different location and observe if the tracker updates the position accurately.
-
App/Platform Test: Log into your tracking platform and verify you're seeing real-time updates.
-
Range Test: Drive around and make sure tracking continues working normally.
-
Feature Test: Test any special features like geofencing, speed alerts, etc.
Wrapping Up
Installing a GPS tracker successfully depends on choosing the right type for your skill level and needs.
OBD-II trackers offer instant plug-and-play convenience, magnetic units provide flexible placement, while hardwired systems deliver permanent security.
Start with simpler options like OBD-II or magnetic trackers before attempting complex hardwired installations. Proper testing ensures reliable tracking when you need it most.
Make an informed decision based on your technical comfort level and security requirements.
People Also Ask:
How long does it take to install a GPS tracker in a car?
OBD-II trackers take under 1 minute to plug in. Magnetic trackers install in 2-5 minutes. Hardwired installations require 1-3 hours depending on complexity.
Can I install a GPS tracker myself without technical skills?
Yes, OBD-II and magnetic trackers require no technical skills. Hardwired installations need basic electrical knowledge or professional help.
Where is the best place to hide a GPS tracker in a car?
Under the driver's or passenger's seat is ideal - rarely checked by others but provides good GPS signal reception.
Do I need to remove car panels to install a GPS tracker?
Only for hardwired installations. OBD-II trackers just plug in, magnetic ones attach to metal surfaces without panel removal.
Will installing a GPS tracker void my vehicle warranty?
OBD-II and magnetic trackers don't affect warranty. Hardwired installations might if improperly done - consider professional installation.
How do I install a GPS tracker without it being detected?
Choose locations away from routine maintenance areas. Avoid obvious spots like near spare tires or oil drains.
Can I install a GPS tracker without cutting any wires?
Yes, OBD-II and magnetic trackers require no wire cutting. Only hardwired systems need electrical connections.
What's the difference between professional and DIY GPS tracker installation?
Professional installation costs $150-$400 but ensures proper wiring and warranty coverage. DIY saves money but requires technical knowledge for hardwired systems.